Friday 30 November 2012

Community Gardens

On the hunt for tips in expanding our vege patch, I recently attended a local Community Gardens open day.

It is a group of mainly older folk who have some fruit trees and raised garden beds beside a retirement home. From what I could gather, they are encouraging individuals and groups to have a 'plot' and pay a small annual fee. They can plant whatever they like and join in a monthly gardening meeting.

Roping in a friend to share the experience, I got to mingle with a dietician, the stay at home mum guru, the 'bee man', uni students and a few other folk who I think lost their way back to the retirement home… plus share in a delicious vegetarian lunch with fresh seasonal produce complete with damper and home-made pestos. Oliver and his friend did some 'craft' and there was even some awesome live music from a very talented local guitarist. I taste tested honey from local native bees (yuck - give me honey bees honey any day), then there was a 'op shop' fashion parade… All the ingredients for a great day out - If only there were more people.

Now I get to have my little 'dig' at that lack of support these 'community' events have. Makes you want to sell up and move to Nimbin! Come on folks - get out there and get involved! Attend open days, make new friends and support these initiatives! Nothing to lose but so much to gain…


Wednesday 28 November 2012

Striking Seeds

So I was thinking, in this extreme heat it can be difficult to strike seeds. Most of the time I have got little shade houses that I made from shade cloth and a bit of wire – they are good but in the hot months I have most of them in use for lettuce etc that need the protection all the time.

So my challenge has been how to get longer rows of seeds to strike... I heard some old timer saying once that the trick for carrots was plant them cover them with wet hessian for two weeks then take it off and they’ll be up, thinking of the theory behind it ummm yeah plausible because you just need small seeds to stay kind of moist.

I found some scrap shade cloth I had in the shed; cut along the long edge then I planted a row of some basil and rocket seeds; laid the shade cloth on the ground (with couple of stick to stop it blowing away) watered them daily– now they’re up, now I’ll wait for them to get up a bit then some rainy or coolish days to take the shade off – job done.


So, it works, that’s proof because I couldn’t strike them 1 week ago... I reckon the challenge now will be transition to no shade watch this space. NOW go plant some seeds!

Sunday 18 November 2012

Sweet Pea Seeds

...a bunch of love

What a brilliant display of sweet pea flowers we had this season. No doubt thanks to nature supplying us with those fat seed pods from the previous year! Any plant that goes to seed it is really worth collecting as this is natures way of saying "hey this plant is growing really well here in these conditions - go populate!"

A few weeks back we collected a huge supply of seed of the last of the rambling vine. If the pod feels dry and rattles when you shake it - it's ready to pull off the bush. If some a still slightly green, but mostly brown, still pull it off - if you leave them somewhere for a week or two to completely dry out, they will be easier to crack open and collect the seed.


Then they go into a brown paper bag just in case there is any moisture so then they won't go mouldy. Label them and come St Patricks Day (17th March) we will be planting out these babies! By then hopefully along a 'new' fenceline… (mmm, possibly a new garden on it's way!)

Saturday 10 November 2012

Dividing and Conquering the Jonquils


A few weeks overdue, today I dug up the Jonquil bulbs from the flower garden. They finished flowering quite a while back and all the tops have died right back. These guys have been in the ground a couple of years untouched and this year you could really notice them doubled up and crowded. So time to lift out! I guess some people do this every year, or others leave them untouched forever, but mine need relocating.
It is really important to leave the leaves die back before you lift the bulb out. Because as the leaves go yellow and fade, the bulb is withdrawing all the nutrients from those leaves to store ready for next season's growth. Depriving spring bulbs of this essential part of their growth cycle will result in poor, or no, flowering next time.

Leaving the tops on also makes it easy to locate the bulbs underneath! It is a little 'hit n miss' with digging them up though - you have to be careful not to slice any in half.
So originally this was a pack of 14 bulbs (yes, still have the label) well now I reckon that has tripled! From what I could tell, the original bulb has at least two other bulbs attached.
I will gently separate them off, making sure a few 'roots' are on each bulb. Loosely bag them up and then into the bottom of the beer fridge until late summer. Bulbs are one of the easiest low care plants with generous rewards! Next I need to research dividing the agapantha's! 

Tuesday 6 November 2012

Organic Pest Control


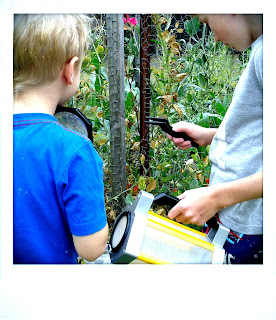
Occasionally we see our children doing some beautiful things together and on the weekend we witnessed some great team work in tackling our grub infestation on the last of the sweet peas and snow peas.
Getting this little National Geographic kit with oversized tweezers, bug catcher and spy glass was hands down one of the best presents I have ever gotten them.

They were quite meticulous in selecting them without squashing them - which is quite ironic when you consider where they were headed...

Also, I didn't have the heart to tell them these old crops were going to be pulled out later today.

They spent a good half hour fossicking and collecting little green grubs and had several trips to the chickens who were hungry for more!
An alternative way to combat these critters is by spraying with a garlic mix: Put a whole garlic bulb through a garlic press and let it sit in a glass jar with a few tablespoons of salad oil. Then mix a few spoonfuls with dishwashing liquid, hot pepper sauce and water in a spray bottle. Spray the affected area once every couple of weeks.

But I think the tweezer approach is way more fun!